Showing posts with label iPad. Show all posts

06 September 2014

How to easily share Keynote presentations and other iWork documents with colleagues

I do a ton of presenting and have found Keynote on my iPad to be a tremendous upgrade over PowerPoint.

  • There's no waiting for boot-up, 
  • Transitions are beautifully fluid, 
  • Animations and videos are 100% reliable and always smooth (and never a black box on the screen where a video is supposed to be!), 
  • Projector compatibility is untouchable, and
  • Courtesy Geekwire's excellent article, "Undeterred
    by Office for iPad, Apple updates iWork suite"
  • Integrated presentation tools such as virtual "crayons" and "laser pointers" mean you never have to face away from your audience.  

In a competitive environment, Keynote is a valuable arrow to have in your quiver.  Plus, the software runs identically on my iPhone, meaning I can always have your presentations in my pocket.  Being able to whip out a compelling, good-looking presentation at a moment's notice conveys a valuable message of preparedness and professionalism.  That is not of merely academic merit-- it has meant actual, substantial sales for me.

Keynote presentations also transport reliably.  There are none of the missing-font and misplaced-video issues that have afflicted PowerPoint for two decades.  With Keynote, all media and other resources are bundled together in an amalgamated file format.

However, the locked-down nature of iOS presents obstacles to sharing Keynote presentations with colleagues.  You can store a presentation in iCloud and share a link to that, but if the presentation is large, chances are excellent that the download into the recipient's device will break at some point.  Perhaps that will improve over time.

iOS also pioneered a concept of hiding the device's file system, having applications own and manage their own files instead.  There is nothing like a Windows Explorer or Finder in iOS.  You open Keynote; your Keynote files are right there.

A mysterious option

First, let's agree that using iTunes to convey files from device A to device B is not acceptable in this day and age.  Next, let's stipulate that iCloud's current file-conveyance capabilities aren't yet industrial-class, especially with larger Keynote presentations.

But there's a third mechanism: the mysterious WebDAV option you may have noticed in Keynote and other iOS apps, both on iPad and iPhone.
Web Distributed Authoring and Versioning is a standards-based approach for making the web a readable and writeable medium.  It provides a web-centric, firewall-friendly way of accessing and storing files across the Internet.  Sounds good... but, it's not clear what even the first step should be for leveraging this technology on iOS.

First, fond as I am of Dropbox, it does not support WebDAV, and per their FAQs they have no plans to do so.  So it's not a solution here.  There are third-party services such as DropDAV that you can subscribe-to that provide WebDAV compatibility for Dropbox, but for my occasional usage the annual cost seemed unreasonable, and some users would be justifiably uncomfortable with allowing a third-party service to have access to their Dropbox'd files.

A few competing cloud storage providers provide rudimentary WebDAV compatibility, but flaws abound.  Box.net, for example, lets you upload and download using WebDAV-- but with a catch: At least for the pricing tiers I explored, you have to give your account username and password to anyone you want to be able to access any file.  That's such an obvious non-starter that it's almost mind-blowing.  Even more mind-blowing is how universal it seems to be; I spent hours exploring various services and this sort of idiocy is depressingly common.  Shame on you, Internet.

An exceptional exception

Finally, an exception popped up.  There is a Swiss online storage company, MyDrive.ch, which offers a responsive, secure and well-priced service that supports WebDAV beautifully and has optional guest accounts.  So, you can distribute the guest-account credentials and limit their access to specific folders and permissions.  Perfect!

MyDrive even offers a free tier, with one guest account and 100MB of storage.  That might be enough for many purposes, but I needed more storage than that.  So I upgraded to their "MyDrive Pro" with over 3GB of storage for the princely sum of approximately $10 a year (and they gave me a bonus month on top of that).  Additional guest accounts are $0.50 a month.

They have a free iOS app too, but that doesn't get around the problem that only Keynote can access your presentations on your iDevice.  For that, we'll use WebDAV:

How to use MyDrive.ch's WebDAV feature to share your Keynote presentations

1) Set up your MyDrive.ch account in a browser on your computer or iPad.  You'll receive an authentication email immediately; look for this, and click the activation link it contains.  All set!

2) In the browser, log in and establish any folder structure you want.  I suggest creating a dedicated folder for uploads from your guest(s) if that's something you might want to enable.  MyDrive.ch enforces a rule that only the master account can write to the root folder; by default, guests can access files in the root folder for read-access only.

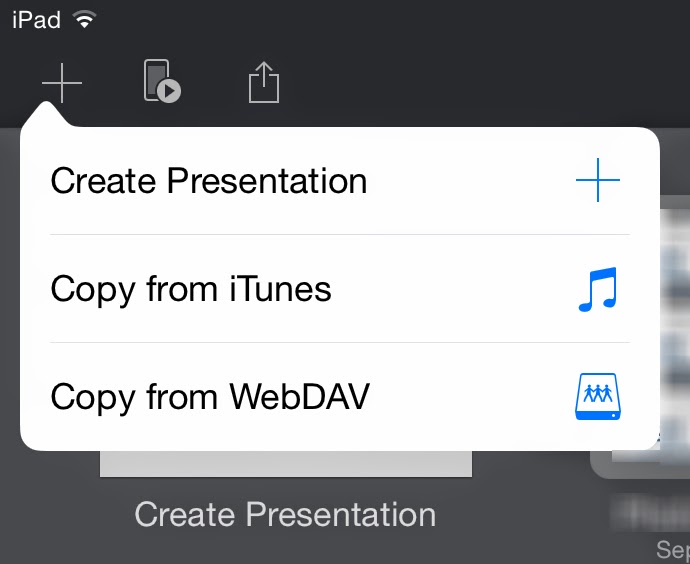
3) Switch to Keynote.  On iOS, in order to log into your WebDAV-supporting service to upload a presentation, you must first go through the initial steps of downloading something even if there's nothing there yet to download.  So to start: In Keynote's screen that presents your collection of presentations, click the "+" sign at the upper left, and select Copy from WebDAV.  A login screen will appear.

4) For the URL, type https://webdav.mydrive.ch/  ...you can add a folder-name to that if you wish.  (All this is case-sensitive.)  Type in the user name you just established, or the guest name in the form of GuestName@MainUserName. Then, fill in the password for the user you just entered. 

5) Click "Sign In."  Your file-list, if any, will appear.  Clicking on any presentation will download it to your iDevice's Keynote store.  (Keynote files will show up with a .zip extension-- ignore that.)

6) To upload a presentation to share with others, cancel out of the login screen and open the presentation you want to upload.  Click the Share button, then Send a Copy.) Select WebDAV.  From the upload formats you're offered, you'll probably want to choose Keynote.  Your iDevice will click and whirr for a moment, and then the file will be uploaded.  

Done!

Steps 4 & 5 are all your colleagues need to access your presentations: they'd just click the "+" button at the top left of their Keynote presentations listing, Copy from WebDAV, fill in the URL and guest username and password, et voila.

A few caveats

MyDrive supports SSL encryption, as you may have noticed from the https URLs in these examples.  However, if you want your browser-based connection encrypted, you must checkmark the "Use SSL encryption" option at the login screen, even if you logged in via https://mydrive.ch.  I would prefer an "always use SSL" option be instituted in the account settings ...and certainly if you log in via an SSL-encrypted page, your connection should stay SSL-encrypted.  From a usability standpoint, this is a minor but potentially important behavior to be aware-of. UPDATE: The responsive MyDrive folks have responded to this post by changing to an always-on SSL policy. Great!

If you wish to allow your colleagues to upload presentations without giving away your master account credentials:
  • Create a folder to receive their uploads:  Log into your MyDrive.ch account using a browser on your computer or iPad.  Add the folder via the "Create Folder" button.
  • Create a guest account for your colleagues to use and set its permissions to allow uploads:  In the Settings menu, select the Guests tab.  Create the guest account there, assigning full access to the guest.  (Currently, MyDrive's upload access setting doesn't actually enable uploading from within iWork applications via WebDAV.  I have brought this bug to MyDrive.ch's attention.UPDATE: Per MyDrive's engineers, this behavior is probably due to Keynote's usage of temporary scratch files.)  Don't worry, a guest account with "full access" can't delete files or folders at the root level.  If you wish to restrict access to specific folders for specific guest accounts, use a browser to go to your main file listing, and click the permissions button to the right of the folder.  


MyDrive.ch offers other goodies too.  For example, you can mount your MyDrive store as a network drive if your operating system supports such things (and all versions of OS X have done so: In Finder's Go menu, select Connect to Server and use the URL https://webdav.mydrive.ch ...authenticating with your username and password.)

Recommended.  My colleagues and I have already found this to be very useful for distributing some of my Greatest Hits presentations... and, likewise, getting their own to me, directly from their iPads.


22 February 2014

How to work around the latest Man-In-The-Middle attacks

The ImperialViolet blog has an informative analysis of the just-patched encryption issue that can potentially expose unpatched iOS devices to a man-in-the-middle eavesdropping situation in some circumstances.  Seems Mac users running OS X 10.9 Mavericks should anticipate an update in the next days too…

Do this now: Update your iOS device straightaway, and your Mac when an update comes.  It couldn't be easier: in iOS, go to Settings, click General, and then Software Update.  You'll need to be on WiFi.  The whole process takes 5-7 minutes and temporarily requires a shade over 1GB of free space on your device for scratch storage.

The vulnerability was in an open-source component of iOS (and OS X, and potentially other platforms).  My point is not to make snide assertions about open source— I agree that many eyes make for a more secure product, and the solidity of Linux attests to that.  But it's no panacea, as mistakes can still be made and persist, as this demonstrates ...as does the 14-month-old WebView Android vulnerability that made the news in the past few days.  In this newest case the flaw is very easy to see even if, like me, you’re no expert in C-like languages or encryption.  But somehow it got overlooked, including by the compilers that one would have hoped would have caught such a visible issue.

From what I’ve read, seems the code involved is a fork of the OpenSSL encryption module.  I’ve not yet seen an analysis of whether it may have propagated beyond iOS/OS X.  You can bet that many eyes are looking into that right now.

As I understand it: in this vulnerability, a man-in-the-middle attacker possessing an encryption certificate signed by a trusted Certificate Authority could potentially intercept an encryption handshake between a user and a secure service or website, and under some circumstances the mechanisms that would detect such an attack would be short-circuited, allowing the MITM to eavesdrop or maybe impersonate the remote party.

A Workaround

Patch or no patch, one way around vulnerabilities of this sort is to tunnel past the attacker using a virtual private network that authenticates by some unrelated mechanism.  Typically, once a VPN client is set up on your computer, tablet or phone, you can connect to it most any time, and it establishes an encrypted tunnel and routes some or all your traffic into that tunnel so nearby eavesdroppers can’t make sense of it.

Using a VPN routinely is not a bad idea for those, like me, who frequently rely on public hotspots in hotels, planes and other venues… including in untrustworthy countries.  A bonus is that a VPN also evades firewall blocks for things like Voice-over-Internet and (in some countries) social media.  Of course, one must have their eyes open about the local rules for utilizing such services… It’s one thing if your hotel blocks VoIP to maximize its in-room-phone revenues, but VoIP is flat illegal in many Middle East countries (for example).  Fortunately, if you’re on a VPN, no one between you and your VPN service can detect what you’re doing, at least not easily.

Also, when you’re connected via a VPN, it appears to the services you connect-to that you are connecting from the geographic location of your VPN’s endpoint.  That’s great for accessing your subscriptions to things like Netflix and Hulu when you’re traveling beyond copyright enforcement borders.

Commercial VPN services are plentiful, cheap and easy to use.  It’s also easy to set up your own: Here at Jordan Manor we have three: two (PPTP and ssh-forwarding) running on Linux on a little Raspberry Pi per the instructions at http://unvexed.blogspot.com/2012/08/how-to-set-up-real-encrypted-vpn.html and http://unvexed.blogspot.com/2012/08/how-to-use-raspberry-pi-as-secure-web.html and then a third kind (L2TP) running on an elderly Mac enjoying a second life running OS X Server.

Although some firewall situations block VPNs as well, having a choice of VPNs maximizes the chance one will get through.  And running your own VPN means blocking strategies based on the IP addresses of known commercial VPN services won’t work.  Corollary: if you successfully run your own VPN in a situation where commercial VPNs are routinely blocked, don’t blab about it, and resist the temptation to run “check my IP address” utilities on the web when using your VPN, as these can serve as honeypots that database the IP addresses of likely VPN services, which can result in their being blacklisted.

(Meanwhile, blocking strategies based on the port numbers commonly used by VPN services can sometimes be evaded by routing your VPN through non-standard ports ordinarily utilized for other services less likely to be blocked, though that’s often not possible since port assignments are often baked in the pudding of most operating systems and clients.  Of the three VPN implementations I run here, only the ssh-forwarding approach is amenable to that dodge.)

The takeaway

Just be careful out there, use duplicative layers of security when you can, pay attention to updates and patches for your OS and applications and especially for things that execute code on your machine, like Java and Flash.

Something to watch

One thing worth listening-for in the coming days is the potential impact of this bug on other platforms that might utilize the same open-source code …including the Tor network, as it is OpenSSL based.

31 December 2013

Cryptopocalypse: Can your iPhone be hacked by the NSA?

Today the Intertubes are awash with hysteric headlines like "The NSA Has Crazy Good Backdoor Access to iPhones".  It's quite the pile-on: besides the press' inclination to tear down the tall dog, there's something stunning about the well-regarded security of latter-day iDevices being easily circumvented by shadowy spies in Ft. Meade.

What's missing--as is all too typical--is a close and sober look at what's being disclosed.

Here's what we know from the latest Snowden documents:

The DROPOUTJEEP iPhone exploit requires physical access to the phone, which suggests it’s based on the sort of hard-boot privilege escalation that has animated the cat-and-mouse game of jailbreaking since 2007.  With each generation of hardware and software, old boot-time-access doors are closed by Apple and new ones discovered by jailbreak hackers.  The result has been continuous improvement of device security.

But hardware and iOS advancements now necessitate that all recent jailbreaks require the device filesystem be unencrypted by removing any passcode (and, in the case of the iPhone 5S, the fingerprint authentication).  That offers good likelihood that your recent iPhone or iPad is safe from this exploit if you enable the passcode.

But here’s something interesting that I’m not seeing discussed amid all the hoo-hah.  The source document that’s being splashed all over the Internet is dated 2007:


Specifically, the document datestamp is “20070108”.  It’s unclear if the date format is year-day-month, as is typically seen in the US outside of at least some government and military usage, or the more globally accepted year-month-day.  I’d argue the latter, because the iPhone was released on June 29, 2007.

Either way, the document relates to the very first generation of iPhone, before the filesystem encryption capability was even introduced.  (That came a year later, with iOS 2.)

So, calm down, people.  Enable your passcode.  And know that there are much more probable threats to your rights and privacy than this one.

14 December 2013

Five essential tools for maximizing your digital privacy

I don't quote my own blog posts very often, but a recent article in Slate, "Facebook wants to know why you didn’t publish that status update you started writing," spotlights an issue that caught my attention in the earliest hours of the Snowden revelations.  It's prompted some discussions and then some advice that's worth a post of its own, so here goes.

Some of Snowden's first bombshells included disclosures that US and allied intel agents could monitor users' logins and other activity on the Internet in real time even for encrypted services.  In the aftermath of these leaks, I commented,
The "As-You-Type" claim is a special concern
Webmail services help prevent loss of your work in the event of a disconnect or crash by frequently storing your draft on their server as you compose it.  This blog post, for example, has been saved to Blogger's server automatically many dozens of times as I've worked on it.  Had I typed something incendiary and intemperate about some politician or bureaucrat, that would have been stored as well-- and potentially monitored and inspected if my phrasing (or integrated profile) contained certain keywords or triggers.  This means cloud-based services of a wide variety have the capability of capturing and potentially monitoring your evolving thoughts and phrasing, even if you think better of them before committing the "Send" or "Publish" button.  So, it's bad enough that what you email and say is monitor-able... what you think is also.
So the automatic server-saving of your drafts not only provides crash-proofness but  allows the service you’re using (and any eavesdroppers, hm?) to observe your thought processes and note any evanescent notions that you may have reconsidered and deleted.  Creepy much?

Five essential tools for maximizing privacy

In response to that article, a correspondent asks if his privacy is more assured if he does his drafting in a word-processor on his computer instead.

Well, as should be clear by now, if your drafts are on some server somewhere, they can in theory be accessed and reviewed by corporate or governmental authorities.  It's happened: just ask David Petraeus.  So you might expect that if your drafting and deletions are entirely constrained to files on your local disk then they would remain private.  Unfortunately it's not quite as simple as that in today's connected world.

Basically: your drafts are private if they're on your computer and not benefiting from any sort of cloud storage or backup service, and assuming no entity has installed a key logger or other monitoring tool on your computer, and that no one physically or remotely accesses your machine while your drafts are on it in some accessible form ...which might not be at all obvious.

That last point is an interesting one.  I've lost the citation but recall how some guy was convicted for some terror-related crime in the past couple years based in part on evidence collected from scratch files scattered on his disk by his word processor.  Finding this evidence was possible because he had not encrypted his hard disk, allowing easy forensic analysis of his activities.  The only defense against this sort of forensic analysis (whether by government or other entity) is to encrypt your disk with a strong password; in the US at least there are legal obstacles to forcing you to give your password up even if accused of a crime.  (Biometric authentication is not constitutionally protected.  So if Fifth Amendment protections against self-incrimination are important in your situation, know that anything protected by something like a fingerprint sensor can be opened by the authorities if you're accused of a crime.)

So there are nuances to what one might expect to be a simple answer.  Meanwhile, the only real news in the Slate article referenced above is that stuff you delete from a hosted draft may still have been noted and logged.  And frankly, that shouldn't be news to alert readers by now.

The first essential tool: personal encryption

Let's face it, cloud services are popular because they're useful.  For example, I routinely do my work in files stored in my Dropbox folder.  The benefit to me is that I can access them from anywhere using any of my devices or even a browser on someone else's machine.  This has been very beneficial to me, plus Dropbox keeps versioned backups of my files, so if I whoops something it's easy to return to a previous version.  Dropbox is a wonderful, reliable, non-creepy, secure service I recommend highly and for which I have documented ways to virtually assure the privacy of your files.  (Newer, self-hosted services like OwnCloud or Bittorrent Sync provide capability similar to Dropbox's without third-party involvement, leaving only the transport channel and physical or remote access to one's machines as potential vulnerabilities.)

Of course, were I writing some sort of radical manifesto, keeping my drafts in my Dropbox might not be the best approach for staying under the radar.  Snowden's whistleblowing tells us that agencies of governments friendly and otherwise (and, who knows, some well-resourced corporations or other entities) now regard ordinary encryption as opaque as Saran Wrap.  Though I'm not in the habit of writing manifestos or possessing other dodgy files, there are some aspects of my finances and work where confidentiality is important, and in those situations I perform my own duplicative private encryption, which is less likely to be easily cracked.

So, the first tools to acquire and learn to use are personal encryption utilities.  For those lucky enough to be using a Mac, OS X's built-in ability to create bandwidth-friendly encrypted sparsebundle disk images is a boon.  A helpful reader points out EncFS as another effective, cross-platform tool for bandwidth-conserving file encryption.  For any platform, TrueCrypt provides good capabilities for encrypting files and creating encrypted disk images, although it lacks the sparsebundle capability that's so beneficial for online storage situations.

For me, the benefits of using online services the way I use them outweighs the risks, which I've reduced and mitigated through tools such as these.  Similarly, I use gmail for some of my e-correspondence.  It's a great service.  I recognize that I, the user, am the product, and the service markets me to its customers as a digital dossier collected from my activities, connections, communications and (per the Slate article) thoughts.  Of course, anyone who writes to me c/o my gmail account gets databased, too... an example of how our personal privacy decisions have implications extending beyond the penumbra of our individuality.

The second essential tool: Whole-disk encryption, and password-enable your device

As previously related, I once caught a coworker just as he started poking around on my laptop after he thought I'd left the office.  He was an odd sort of duck, and my immediate thought was that he intended to put something problematic on my machine.  It happens.  In fact, it's the sort of threat that's far more likely than NSA targeting most readers here.

And it's readily addressable: turn on your device's password capabilities, including a screen-saver password or other lock-code that activates when your machine is unattended.  This goes for your smartphone as well as your computer.

But this is just an inconvenience to a determined attacker.  Devices get lost or stolen all the time, and Evil Hotel Maids in some countries can and do access computers left in visitors' rooms to perform espionage on behalf of some state or industrial entity.  The best defense against this is a good whole-disk encryption scheme.  For example, the Mac's FileVault 2 option has been a standard feature of OS X for several generations now, and it is highly effective and efficient.  If your machine's manufacturer offers something of the sort, turn it on.  If not, read some reviews and buy a utility that will do the job.

iPhones and iPads automatically encrypt their file systems when a passcode is turned on-- brilliant.  So, do that.  Recent versions of Android offer something similar.

The third essential tool: Email encryption

Ed Snowden insisted on PGP encryption of email communications, and that's a remarkable endorsement of this free and effective technology.  Its developer, Phil Zimmermann, nearly went to prison for developing it, and then-Sen. Joe Biden made two attempts to sneak wording criminalizing personal encryption into totally unrelated legislation.  It's instructive to ponder why tools that allow individuals to maximize their own privacy have been so controversial for so long... this occurred more than a decade before 9/11.

Today, much of what we do on the Internet is encrypted in transit from your computer to at least the first node in the chain to whatever service you're using.  But that only means eavesdropping is blocked to those lacking the keys, and only while in transit, and only for that hop.  For example, Gmail is very securely handled between your browser and the Gmail servers.  Once there, your emails are stored in plain text.  Worse:
Under the Electronic Communications Privacy Act (ECPA) of 1986, police only need a subpoena, issued without a judge's approval, to read emails that have been opened or that are more than 180 days old.
Meanwhile, the repeated compromises of the public Certificate Authorities suggests any encryption based on CA-managed keys may be vulnerable.

The solution is to heed Snowden's advice and manage your own email encryption for those situations when postcard-class privacy is inadequate.

Setting up PGP takes a little effort and is, unfortunately, still a bit of a geek-fest, but it's worth the effort.  Mac users have it especially easy via the marvelous GPGTools.org toolkit, which integrates brilliantly with Mac's Mail.app.  GPG4Win offers something similar for Windows users.  And all participants in a conversation must have established and exchanged their public keys.  Assuming the participants are trustworthy and careful, this ensures that private discussions remain private.

The fourth essential tool: Back up!

We tend to get worked up about the risks to our data, wealth and privacy from shadowy agencies and sinister corporations, but the greatest risk is the most unavoidable: the eventual failure of our disk drives, including SSDs.  That is a matter of when, not if.

There's only one defense, and that is to maintain current and duplicative backups.  Invest in two USB pocket drives, and back up to them in alternating fashion.  Keep them in different places.  And consider supplementing your local backup strategy with online backup services like Carbonite or my own chosen service, Backblaze.  All offer excellent transport encryption; Backblaze offers a free additional private-encryption capability which further cloaks your stuff on their servers, for a great price.

But if the service happens to back up a draft that you're working on, then there's another example of your drafting-and-deletions hypothetically being accessible to someone with the right access and tools.  But that's many levels lower in terms of exposure than writing your drafts in a gmail/Yahoo/Hotmail composition window, Facebook draft post, Google Docs draft, etc.

The most essential tool: control your own computer

So there are things you can do to improve privacy and increase the chances of flying under the radar of governmental and corporate eavesdroppers and snoops.  Short of staying offline entirely, that can include

  • Carefully selecting (and minimizing) what online services you use and how you use them, 
  • Choosing an operating system that is comparatively secure, 
  • Employing disk, file and transport encryption to increase security, and 
  • Leveraging virtualization, compartmentalization, userspace separations and utilization of separate machines.


That last recommendation is quite important.  We tend to fixate on the shadowy cloak-and-dagger players, and sure: those are sexy threats that make headlines.  But the likelihood most of us will be snared by their tentacles in any meaningful way are small compared to the potential consequences of other dumb things we do.

Top among them: using your company computer for personal purposes.

Just don't.

For starters, it's a great way to get fired.  I've known smart people whose work is legally quite sensitive yet they watch naughty videos, play online games, download warez and do other risky things on their company computers, sometimes even in their normal user accounts.  Dumb, dumb, dumb.  Just ask John Deutch.  (What is it about CIA Directors and their digital idiocy?)  Frankly, if I caught an employee doing that, I'd fire 'em myself just out of intolerance for dumbasses.

So, just don't.  With the cost of terminating employees growing higher every year, IT departments are increasingly tasked with monitoring employee computer usage, documenting offenses useful for knocking down exit demands and defending against termination-related lawsuits.  So keyloggers are routinely installed, screen-snaps are covertly acquired, webcams are snapshotted to capture employee behavior, networking logs are databased... do a bit of searching and you'll find many super-creepy examples out there of employers watching and observing everything their employees and contractors do at the keyboard, and of tools marketed to them for ever deeper surveillance, tools like http://talygen.com/CaptureScreenShot and http://www.oleansoft.com --there are dozens and dozens.

That is a far more present threat to most people than the NSA, or industrial espionage, or the depredations of sneaky social-networking services and ad-platform companies masquerading as cloud service providers.  Solution: Get your own damn laptop or tablet, and lock it down, and keep it in your possession as much as possible, especially when you travel.

And mind your assumptions.  If you think you're safe, you're doing it wrong.

17 November 2013

A Dropboxless Dropbox for extra-secure file sync

Dropbox is great for sharing
files between your machines.
I've used and enthusiastically recommended Dropbox for years: as a costless "virtual thumb drive" for ferrying files between my machines, for sharing files too big to email, and even to host web content.  Great stuff.  I also make a habit of using my Dropbox folder for my current work, so every document I'm working on gets backed-up in real time, in versioned form so I can even return to a previous revision if I whoops something.  I love Dropbox.  It's just an awesome service: sign up at http://db.tt/Me4yRjt and I get a small storage bonus.  

But I have harbored no illusions about the privacy implications of storing stuff in any third-party's cloud, even before the Snowden revelations.  So one of my first blog posts centered on a Mac-centric workaround: use the Mac's magnificent ability to create bandwidth-friendly, encrypted sparsebundle disk images, storing the image in my Dropbox instead of the individual sensitive files.  There's evidently a demand for doing such things, as that post quickly racked up many thousands of hits, has remained at or near the top of Google searches regarding Dropbox security since it was published, and was featured by influential tech commentator Shawn Blanc.

Over time I've kept an eye on the Dropbox market, signing up for (but, frankly, rarely using) alternatives ranging from SugarSync to SkyDrive to SpiderOak.  All are fine services with generous free storage offerings to get you started.  SpiderOak in particular has excellent privacy engineering.  None, however, are both free and open-source (FOSS).  There's SparkleShare, which is FOSS, but it lacks a mobile client, especially for iOS (which I'd need).  Tarsnap and Unison are others, but they're not seamlessly cross-platform and lack a mobile client.  OwnCloud is FOSS but requires a central server-- great for enterprises but overkill for my sync-centric individual's usage.  

All told, I probably have more than 100GB of free storage I don't use, on top of the Dropbox storage that I do use.  

But now there's an alternative that's going to pull at least some of my usage away from Dropbox.  It's Bittorrent Sync, a peer-to-peer implementation of Dropbox-like functionality that syncs stuff between your machines and mobile devices.  It's costless but not yet open-source, though the developers have adopted a never-say-never posture towards FOSS.  

Bittorrent Sync is from the folks who make the excellent uTorrent torrent-management client, and it extends the serverless torrent concept to syncing one's files between machines.  Security seems good (though without open-sourcing, that's a statement of faith) and performance is excellent.  Free clients are offered for Windows, Mac OS X and Linux, and for iOS and Android.  Setup is incredibly straightforward: start with your desktop machines, pasting the automatically-generated key from one client to the other to establish encrypted syncing between them; then for your mobile devices, just scan the QR code your desktop installation will present for you, and setup is complete.  Couldn't be easier, and bonus points to the Bittorrent folks for finally finding a good use for QR codes!

Then it just works.  Put a file in a folder on one machine and it will automagically appear on all the others as long as one remains powered-up.  Just like Dropbox, only there's no third-party central server involved.  (And, no web access-- which may be a plus or a minus, depending on your intended usage).  
Sharing is achieved by providing a key code to those with whom you want to share; they plug this into their own Bittorrent Sync client.  Sharing key codes for read/write and read-only are easy to generate, as are one-time keys that expire after 24 hours.  And files are versioned!

Bittorrent Sync shares some attributes with other file-syncing services: Storage folders on your clients are not encrypted, though the transmission of files is.  Syncing across hotel and a few other public networks may be problematic depending on how they're set up (my Mac client set itself to listen on TCP port 26085, which some networks might block).  And there's the pervasive risk of potentially instilling a sense of false confidence that can contribute to oversights of fundamental security and privacy practices, such as 
  • Failing to set up whole-device encryption, 
  • Failing to establish a long passcode on your mobile devices, 
  • Failing to physically secure your devices or lock their screen when you turn away...
As a useful tool for privacy or just plain easy-peasy syncing, color me impressed about Bittorrent Sync.  It works nicely and is as polished as you'd expect from the folks who gave us uTorrent.

UPDATE: Here's an especially informative review.


22 June 2013

How to make secure, encrypted phone calls... for free

The ZRTP-capable
Groundwire app for iOS
Recent revelations have alleged wholesale governmental monitoring of phone conversations and emails.  Governments (plural) are reported to have real-time ability to access encrypted digital connections of all kinds, including Skype.  My own hypothesis, based on details in the the published allegations and known hacks of Certificate Authorities (on whose infrastructure the entire trust system of today's Internet is based), is that purloined Certificate Authority certificates are being utilized to allow inexpensive monitoring of communications transported over encrypted channels like SSL and TLS.  The key to privacy is to utilize encryption techniques which do not depend on the compromised Certificate Authority system.

VoIP is rarely encrypted at all, but that may be changing as dismayed citizens demand an end to suspicionless, warrantless surveillance.  Today, ostel.co (note: not .com) is a free/open-source project which implements the ZRTP communications-encryption technique which allows users to call each other securely and without cost over WiFi or other Internet connections.  Conference and video calls are also supported.  More info about ZRTP here.

Each participant must run a ZRTP-capable VoIP client on their computer or smartphone-- this is not something you can use a old-timey analog telephone with.  Clients are available for a variety of platforms including OS X, Windows, iOS and Android.  Some are even free!

Getting started making and receiving secure calls is simple: you sign up for an account at ostel.co and give yourself a user name.  You download the appropriate app onto your computer or smartphone and set it up to talk to your ostel.co account.  Your friends and associates do the same.  You then ring each other up using your respective user names, and validate a randomly-generated numeric code.  Pretty simple.

Documentation is sparse, to put it charitably, but here's how I got it working on OS X 10.8.4 Mountain Lion:

  • Download Jitsi, a free/open-source client capable of, among other things, telephony using ZRTP encryption.
  • Run it... or attempt to.  On later builds of OS X you may receive a message that Java 6 is required.  Well, I have Java 7 installed and enabled (it's needed for some other software I use), but this didn't seem to be acceptable to Jitsi.  With some trepidation given the security issues surrounding Java recently, I accepted the download of the older version.  There was no progress indicator, but events seemed to proceed without issue (and frankly rather quickly-- I have my doubts that Java 6 was installed at all), and eventually I was able to load and run Jitsi.  The current, recommended version of Java 7 remains intact on my system and is still my default, per the version tester at java.com.
  • Now you need to set up Jitsi to use your ostel.co account.  This is totally undocumented, but what works is to open its Preference pane and add a SIP account, specifying YourUserName@ostel.co (again, note it's not .com) and inputting your ostel.co account password.  
  • Done.

Set-up should be similar for other apps.  The only prerequisites would seem to be (1) the ability to work with generic SIP connections and (2) ZRTP compatibility.  (Be sure to select your desired audio input and output in the Preferences-- Jitsi had selected AirPlay as my default, rather than my Mac's speakers or headphones, causing some momentary confusion for me.)


[DELIGHTED UPDATE: seems the free Linphone iPhone app supports ZRTP!  Once you have installed the app and set up a username at ostel.co, just go to the app's settings and input your ostel.co username (minus the "@ostel.co" part), then your password, then "ostel.co" for the domain.  Then, in the Network settings, select Media Encryption and tick ZRTP.  Done!  This app even seems to support encrypted video.]

Now you can enjoy secure calls... or (let's have our eyes open about such things) allegedly secure calls.  Also keep in mind that the use of encryption technologies including email encryption and Tor (if detected) can spotlight you for special scrutiny and indefinite retention of your emails and other data, even if you are a U.S. citizen.

Audio quality in my testing has been excellent, clear and crisp and without echo.

28 August 2012

How to set up a real, encrypted VPN through your Raspberry Pi

Well isn't it always this way... the very day after I post on how to use the Raspberry Pi as a secure Internet proxy by working around a missing element in its variant of Linux, that missing element becomes available in the stock OS!

Here's how it went.  On a whim, even though I'd just given my Raspi a full software update just two days ago when I made that earlier post, I repeated the process again today:

sudo apt-get update
sudo apt-get upgrade

...and lo, there were some important packages that updated.  Sniffing further, I attempted the first step of the installation process for installing a "real" PPTP VPN onto Debian Linux:

sudo modprobe ppp-compress-18 && echo success

No error was reported!  The formerly-missing MPPE module has been added to the kernel.

Well now.  This poses the tantalizing possibility of setting up a real, Point To Point Protocol (PPTP) Virtual Private Network using the Raspberry Pi as a gateway.

A VPN strategy for every situation

Among the highly non-trivial benefits of the PPTP VPN versus the ssh proxy tunnel I documented previously include compatibility with iPhones, iPads and other mobile devices which might not offer ssh port forwarding capabilities in their operating systems.  That was the basic trick of the ssh proxy tunnel.

On the other hand, PPTP VPNs utilize the GRE 47 protocol which is some routers find indigestible while others can accommodate only one GRE 47 connection at a time and will block all others-- a recipe for trouble in hotels and public hotspots.  By comparison, the ssh proxy trick I documented--which leveraged the https or other common port for the ssh proxy tunnel--will be more likely to always work as you travel, at least for your laptops.  Frankly, at this point I have both the ssh proxy tunnel and the PPTP VPN set up on my Raspberry Pi, and I might as well leave it that way so I'm covered for just about any circumstances.

Here's how


There are many tutorials available for setting up the PPTP server daemon (pptpd) on a generic Debian Linux machine.  However, I've found that the Raspberry Pi presents a few quirks and needs its own instructions.  The following steps worked for me and resulted in a robust VPN that has held up to my usage so far-- this blog post was constructed entirely while connected via my Raspberry Pi's new PPTP VPN.

  1. Open port 1723 on your router, pointing it to your Raspberry Pi's IP address on your LAN. 
  2. Your Raspberry Pi should have a static IP address on your LAN.  Good instructions for that are here.
  3. Next, if your home ISP does not give you a static IP address on the Internet, you'll need to set up an account with a dynamic DNS (DDNS) service.  This will give you a URL which will always point to your router.  My D-Link DIR-655 router (a truly excellent router, by the way) earns me a free DDNS account on D-Link's service; there are plenty of alternatives.  In D-Link's case, the url will look like [username].dlinkddns.com.  UPDATE: My trusty DIR-655 died, and the units currently being sold now are totally different.  I switched to an Apple Time Capsule, which necessitated a new dynamic DNS provider.  I chose DynDNS.org... you get one free host name for trying their 14-day "pro" account (which you can cancel, keeping the host name, though their services are powerful and quite cost-effective for what you get).  
  4. Log into your Raspberry Pi either via its local console or via ssh.  
  5. Issue sudo apt-get install pptpd
  6. Issue sudo nano /etc/pptpd.conf --this will start a simple text editor on your Raspi.  Note that most lines are comments and are commented-out with a "#" at the beginning.  Scroll down until you find the lines which set localip and remoteip.
  7. Set localip to your Raspberry Pi's IP address.  For me, that line becomes localip 192.168.0.202.
  8. Set remoteip to encompass a small block of IP addresses on your LAN that will be made available to your remote client(s).  For me, that line became localip 192.168.0.240-255 ...there are various rules for how that block can be constructed; use the format shown here or it might not work.  
  9. Hit ctrl-X and save the file.
  10. Now issue nano /etc/resolv.conf and make a note of the nameserver identified in this file --for me, and I'd bet most other folks, it's the LAN address of my router, 192.168.0.1.  Hit ctrl-X to close the editor.
  11. Issue sudo nano /etc/ppp/pptpd-options and scroll down until you find references that set ms-wins and ms-dns.  You want to set thise to the nameserver address you just noted.  For me, these lines became ms-wins 192.168.0.1 and ms-dns 192.168.0.1 respectively.  Hit ctrl-X and save the file.  This completes the basic IP setup for your new VPN.
  12. Issue sudo nano /etc/ppp/chap-secrets and scroll down to an empty line.  Here is where you will specify your users who can use your VPN.  For a user named Ralph with a password of SuperSecret123, the line would simply be Ralph pptpd SuperSecret123 *  --the asterisk at the end is important as it specifies that Ralph can tunnel in from any IP address.  Repeat with additional lines to specify other users you want to allow to tunnel in via your Raspberry Pi.  Then hit ctrl-X and save the file.
  13. Issue sudo nano /proc/sys/net/ipv4/ip_forward  ...see the zero?  Change it to a 1.  This tells your PPTP daemon to forward remote clients to the Internet.  Hit ctrl-X to save the file and exit the editor.
  14. Issue sudo nano /etc/sysctl.conf and scroll down until you see the commented-out line that states net.ipv4.ip_forward=1  ...uncomment this line (remove the"#").  This will tell your Raspberry Pi to always allow remote clients to access the Internet via their tunneled connection.
  15. You're done!  Reboot your Raspberry Pi.
  16. While you're waiting for it to sort itself out, you can set up a VPN connection on your traveling (client) machine.  On the Mac, go to System Preferences | Network, click on the padlock and authenticate as an administrator user, Click the "+" sign and select "VPN" from the pull-down menu.  Give this new VPN a name.  Voila a new, unconfigured VPN connection will pop into your network-connections options.  With this selected, type in your dynamic DNS address for your Raspberry Pi (e.g., YourUserName.DynDNS.org).  In the Account Name field, put the username you specified in step 12 ("Ralph").  Click the Authentication Settings and specify the password from step 12 ("SuperSecret123").  Click the Advanced button, and be sure to checkmark the option to route all your Internet traffic through the VPN.


You're done!  (Setting it up on an iPhone or iPad is even easier.)  

You should be able to connect now, and all your Internet traffic will be encrypted and funneled through your Raspberry Pi from wherever you are... or at least from wherever VPN connections are tolerated.  For other places, consider the ssh proxy tunnel I wrote about before.

24 June 2011

How to Roll-Your-Own with VoIP for Massive Phone Savings

Here's something else that's worked well for us and friends to whom I've emailed the details.  90% savings is something everybody seems to like.

Our home phone service is now about $7 a month total for two lines vs. ~$35 for Pacific Bell for each line.  We just weren't getting $70+ worth of usage out of the two landlines. But going all-cell wouldn't have worked for us for a variety of reasons (not least being the lack of emergency-call traceability for cell calls).  Meanwhile prepackaged Voice over Internet Protocol (VoIP) services from PacBell, Comcast and Vonage wouldn't have saved much, and they necessitated purchase or rental of adapters locked to their service.  (UPDATE: See Summary Comparison: Landline vs. Alternatives and Is the Landline Doomed?)

Instead, I chose a far geekier solution, based on the services of www.voip.ms, that saves the equivalent of four six-packs of my favorite hoppy IPA each month... per line.  Voice quality, domestically and to Europe, is great.  We kept our standard phones-- no computer is necessary. But you can use free VoIP apps on your smartphone, laptop, iPad or iPod Touch, too, anywhere you have good Internet access or even 3G.  Our monthly cost breakdown for two lines of excellent, reliable service is now:
  • Home line ported from PacBell, $1.49
  • Other line from voip.ms' big pool of local numbers on their website: $0.99 
  • Optional e911 service: $1.50
  • Usage: $0.01-0.016/minute for domestic & European calls using the highest call-quality option
  • We also pay the $0.008/call to have our phones display the name of the caller. 
  • State taxes: $0.00
  • Local taxes: $0.00
  • Federal taxes: $0.00
  • Bureaucratic boondoggles: $0.00
  • Redistribution: $0.00
  • Fees, impositions, assessments, Universal Access for those-less-fortunate (who somehow all seem to have cell phones anyway): $0.00

Here's How:

This is the Golden Age of VoIP wholesalers with pay-as-you-go pricing, and also of cost-effective hardware adapters for your old phones.

In my research, two VoIP providers emerged as particularly promising: CallCentric and voip.ms. Both offer free signups, affordable landline-number porting, and great per-minute rates.  I chose voip.ms based on its user reviews, rich feature-set and international presence. Its setup process is browser-based. Provisioning using a temporary number in my neighborhood took a few minutes.  The only caveat is that voip.ms' setup pages can be intimidating, as VoIP is a bit of an acronym-fest. But the learning curve is fairly shallow and quick.

If you have a solid WiFi connection and a good router, you can try it yourself in minutes with an iPhone, Android phone or computer:
  1.  Set up an account at https://www.voip.ms /signup.php ...note, signup is free, but voip.ms works on a prepayment methodology.  You will establish your account with $25 in funds from any credit card.  As you whittle down your balance with usage, you'll receive an email when replenishment is needed.
  2.  Now get yourself a phone number-- a Direct Inward Dialing (DID) number in VoIP-speak.  Go to the "Order DIDs" page, https://www.voip.ms/m/dids.php  ...getting a number will set you back a whopping one-time $0.50 and then $0.99/month plus usage for the per-minute plan that's appropriate for most people.  (You can port a landline later if you want.  It takes a little time and costs about $20, and the ported line is $1.49/month.)
  3. You'll have some options to choose.  Generally it's best to select the voip.ms server that's geographically closest to you.  (If you want to get geeky, do some ping tests.)  Select SIP/IAX as the routing option for now.  (SIP stands for Session Initiation Protocol and is the most-used open standard specification for softphones, IP phones, etc.)
  4. Now set up a subaccount to play with.  This is like an extension.  Go to the Sub-Accounts menu, https://www.voip.ms/m/subaccount.php and select "Create Sub-Account."  Give the subaccount a name in the "Username" field (it'll be something like 12345_yourchoice, where 12345 is your voip.ms account number).  Set a password.  Since I'll be documenting using the 3CXphone app on an iPhone below, click on Advanced Options and select the g.711u and gsm codecs-- these are the sound-encoding algorithms supported by that app.
Done.  You now have a new phone number.

There are a variety of SIP-compliant softphone apps available for iPhones, Android phones and computers.  The two I like best are Whistle Phone (iOS, Windows, Mac) and especially 3CXphone (iOS, Windows, Android), which has deeper technical options and worked best for me when I was traveling in Europe.  Plus, 3CX is headquartered in Cyprus, a country dear to my heart.  Both work over WiFi and also 3G in most places.  Here's how to set up the 3CXphone app for iPhone, iPad and iPod Touch:
  • Download and install the app.
  • When you open it for the first time, you'll need to set some settings.  Recommended settings are shown at the left.  Note that some of them are blank. 
  • The User and ID fields should match the subaccount username you chose.
  • Note the server and proxy server fields should generally be the servers in voip.ms' arsenal closest to you.  They don't have to be the same ones you chose when you set up your account, and you can change them when you travel.  (Voip.ms lets subaccounts call each other entirely for free if they're on the same server.)  Incidentally, my calls to the U.S. from London were fine even though I left things set to the Los Angeles server.
  • The "Record Calls" option might not be legal depending on where you call to or from.  Best to leave it turned off.  (It only seemed to record my side of the conversation anyway.)
  • Multitask Mode allows 3CXphone to keep running when you open another app or sleep the phone.  Handy-- that means you can receive calls, and calls continue if you hit the Home button.  There's a modest hit to your battery life.
  • Bluetooth is supported; just be sure your headset is paired and operating before starting the app.

Done.  Now you can make calls!

To receive calls on this line you just created, go back to the voip.ms website, select "Manage DIDs" from the DID Numbers menu, and select this subaccount in the Routing field.  Save.  Done.  Now you can receive calls.

For your former landlines:

For our home phones, after some research I ordered an unlocked Linksys PAP2T-NA analog telephone adapter from Amazon for $49 with free shipping. This is a gizmo about the size of a pack of cards which plugs into my WiFi router and then into any conventional phone (or dead wall jack) and can be used with any VoIP provider. It's easy to set up; voip.ms has configuration tips on its website.  (UPDATE: "Mango", a frequent poster on VoIP forums and obviously knowledgeable, has his own configuration tips here, and concise reviews on the PAP2T-NA and other inexpensive adapters here.) (UPDATE: the -NA stands for "North America."  There are other models for other locales, for example -EU for Europe.  Near as I can tell, the power plug is the difference.) (UPDATE: See comment #3 for this post; the OBi100 adaptor, also available from Amazon, seems like a great alternative to the PAP2T, and easier to set up.  FURTHER UPDATE: I've now had the chance to use and review the OBi100 adaptor.  It's great, and indeed easy to set up.  See my report here.)

Then we started voip.ms on the process of porting our landline number over, as we wanted to keep it. This took about ten days and was painless, with progress emails along the way. In fact, whenever I had a question regarding any aspect of the service, voip.ms provided snappy support. I could not be more impressed with them as a company or with the quality of their service so far. Kudos also to AT&T/Pacific Bell for their cooperation and the nice good-bye note they sent at the conclusion of the port.

While we waited, we played with the temporary number from voip.ms.  Once the porting was complete, I switched the routing so our ported number rang the PAP2T's subaccount, then sauntered out to the patch panel on the wall of our house and unplugged the PacBell phone line. After verifying that there was no signal on the home lines, I plugged the little Linksys into an unused home-phone jack. Voila: it now provides phone service to every jack in the house.

Bottom line:
  • The change is transparent to anyone who might use our phones.
  • We can set up conference calls with any number of participants.
  • You can get fancy with voip.ms' routing menu.  We now have an Interactive Voice Response (IVR) set up on voip.ms so incoming callers get a voice menu: 1 rings the home phones, 2 takes a voicemail, and--get this--3 gives an international dial-tone, password protected, so we can call Europe from anywhere for cheap just by dialing home. I had a lot of fun setting up my incoming-call greeting: "Thanks for your call. Friends, family and people with whom we do business, press 1. For voicemail, press 2. For an international dialtone, press 3. Telemarketers and robo-callers, we have a specific digit for you." ...Forcing callers to press 1 to ring the home line blocked 8-12 annoying robocallers daily during the runup to the November election.
  • Connecting the Cisco/Linksys PAP2-T adapter
    that lets you use old-timey standard phones is easy.
    Photo courtesy Amazon
  • There's a sophisticated voicemail system which has a wonderful option to speak the caller's phone number clearly. Voicemails are also emailed to us in the form of .wav attachments which play crisply on our computers, iPhones and iPad. Very handy, and a free service.
  • There are many options and features, including 800 numbers.
  • The savings are massive, each and every month.
Recommended.

If you have a solid Internet connection at your home or office and a decent router, cut the cord! (If your service is DSL, work with your phone company prior to the porting process to ensure your Internet remains in-service, and be sure all signal is absent from any wiring to which you connect the PAP2.)


Resources:

Great router for residential or business use, with an excellent firewall and quality-of-service (QoS) engine for good VoIP performance: D-Link DIR-655: http://www.amazon.com/s/ref=nb_sb_noss?url=search-alias%3Daps&field-keywords=d-link+dir-655

Apple's routers are superb: http://store.apple.com/us/browse/home/shop_mac/mac_accessories/airport_wireless

Note: The highest-quality VoIP option (g.711u) consumes about 80-90kbps of bandwidth including overhead.  Info: http://en.wikipedia.org/wiki/G.711#G.711_.CE.BC-Law

Visualware.com provides a spectacular free online tester, optimized to evaluate your Internet connection specifically for VoIP: http://myspeed.visualware.com/indexvoip.php